1. Basics
1.1. Architecture
One of the main goals of Pandroid archetype is to help you organise your project and share a common vision/architecture with other developers.
"Why bother ? Because I understand my code and I work faster like that."
True, but I’m sure you had to make a changes on an application of another developer and it looked like a mess. Yet it was a piece of art for him.
What a waste of time to refactor the code of the others because you just don’t understand it. Neither share the same practices…
Most of the time all of that is just a matter of perspective. With Pandroid we try to share the same vision and understand each others much more faster.
To illustrate this lets take a look at this schema:
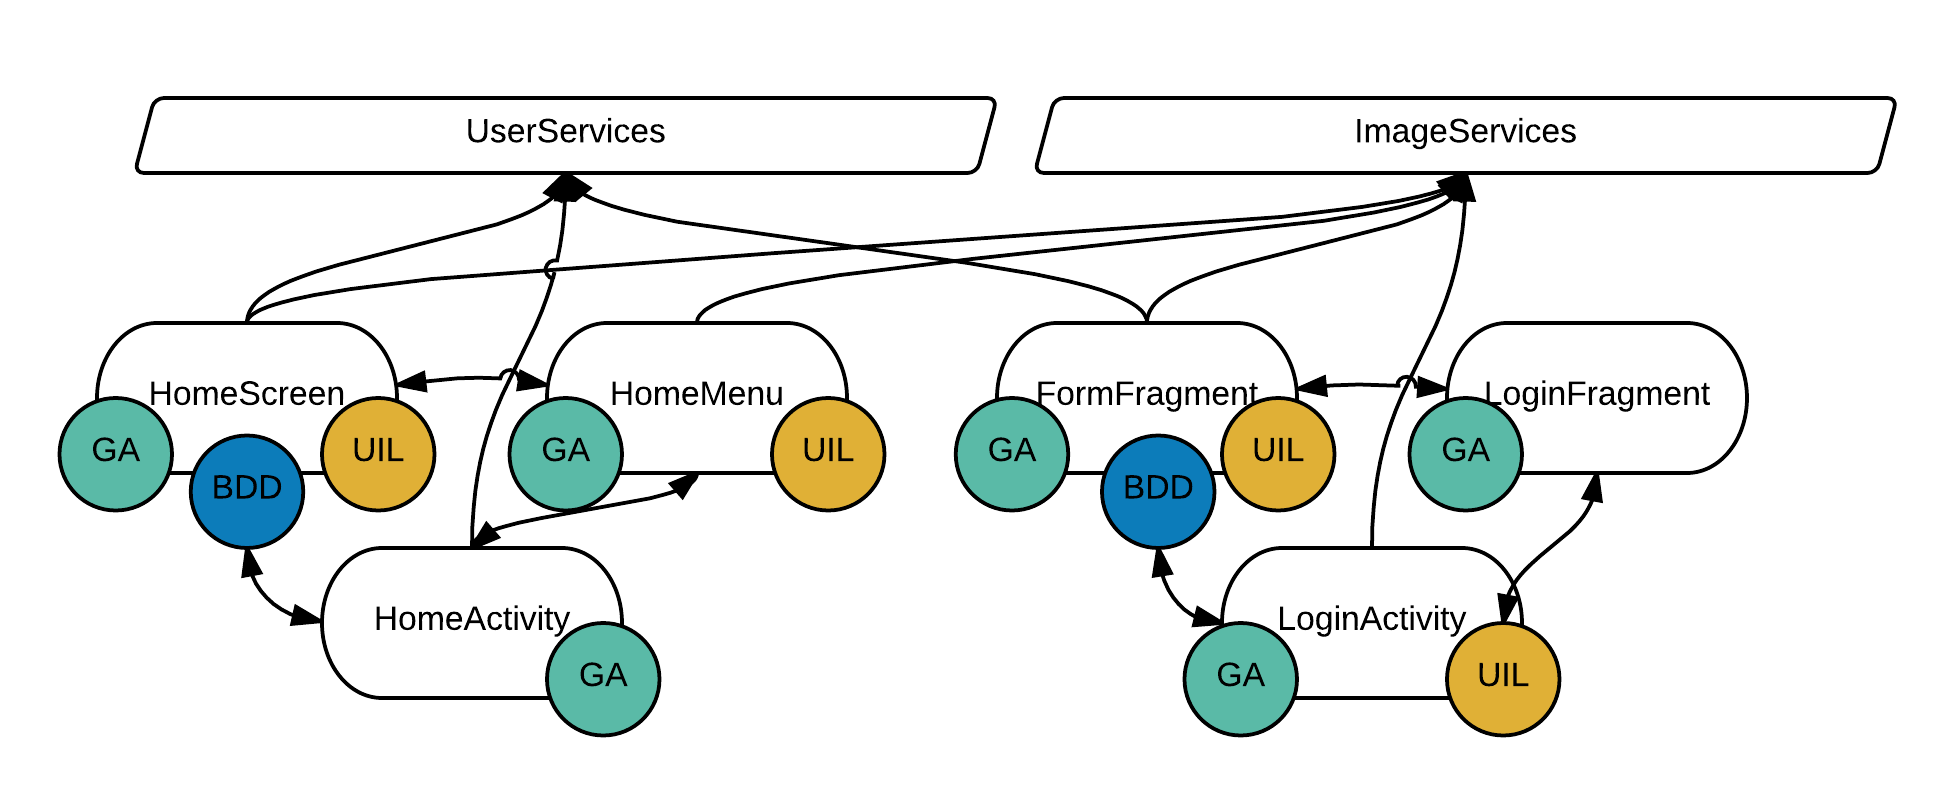
In most applications, when nothing is done to organize the code, it could look like this. Libraries are used in a lot of classes. We don’t know which classes are used to run a functionality or another. If I am asked to change my application structure, I could be in a big trouble because all of my screens which are linked to each others : I would have to extract my functionalities from my UI. And if I need to change a library for another one… I’m just screwed.
In order to resolve all of these issues, Pandroid proposes a modular architecture
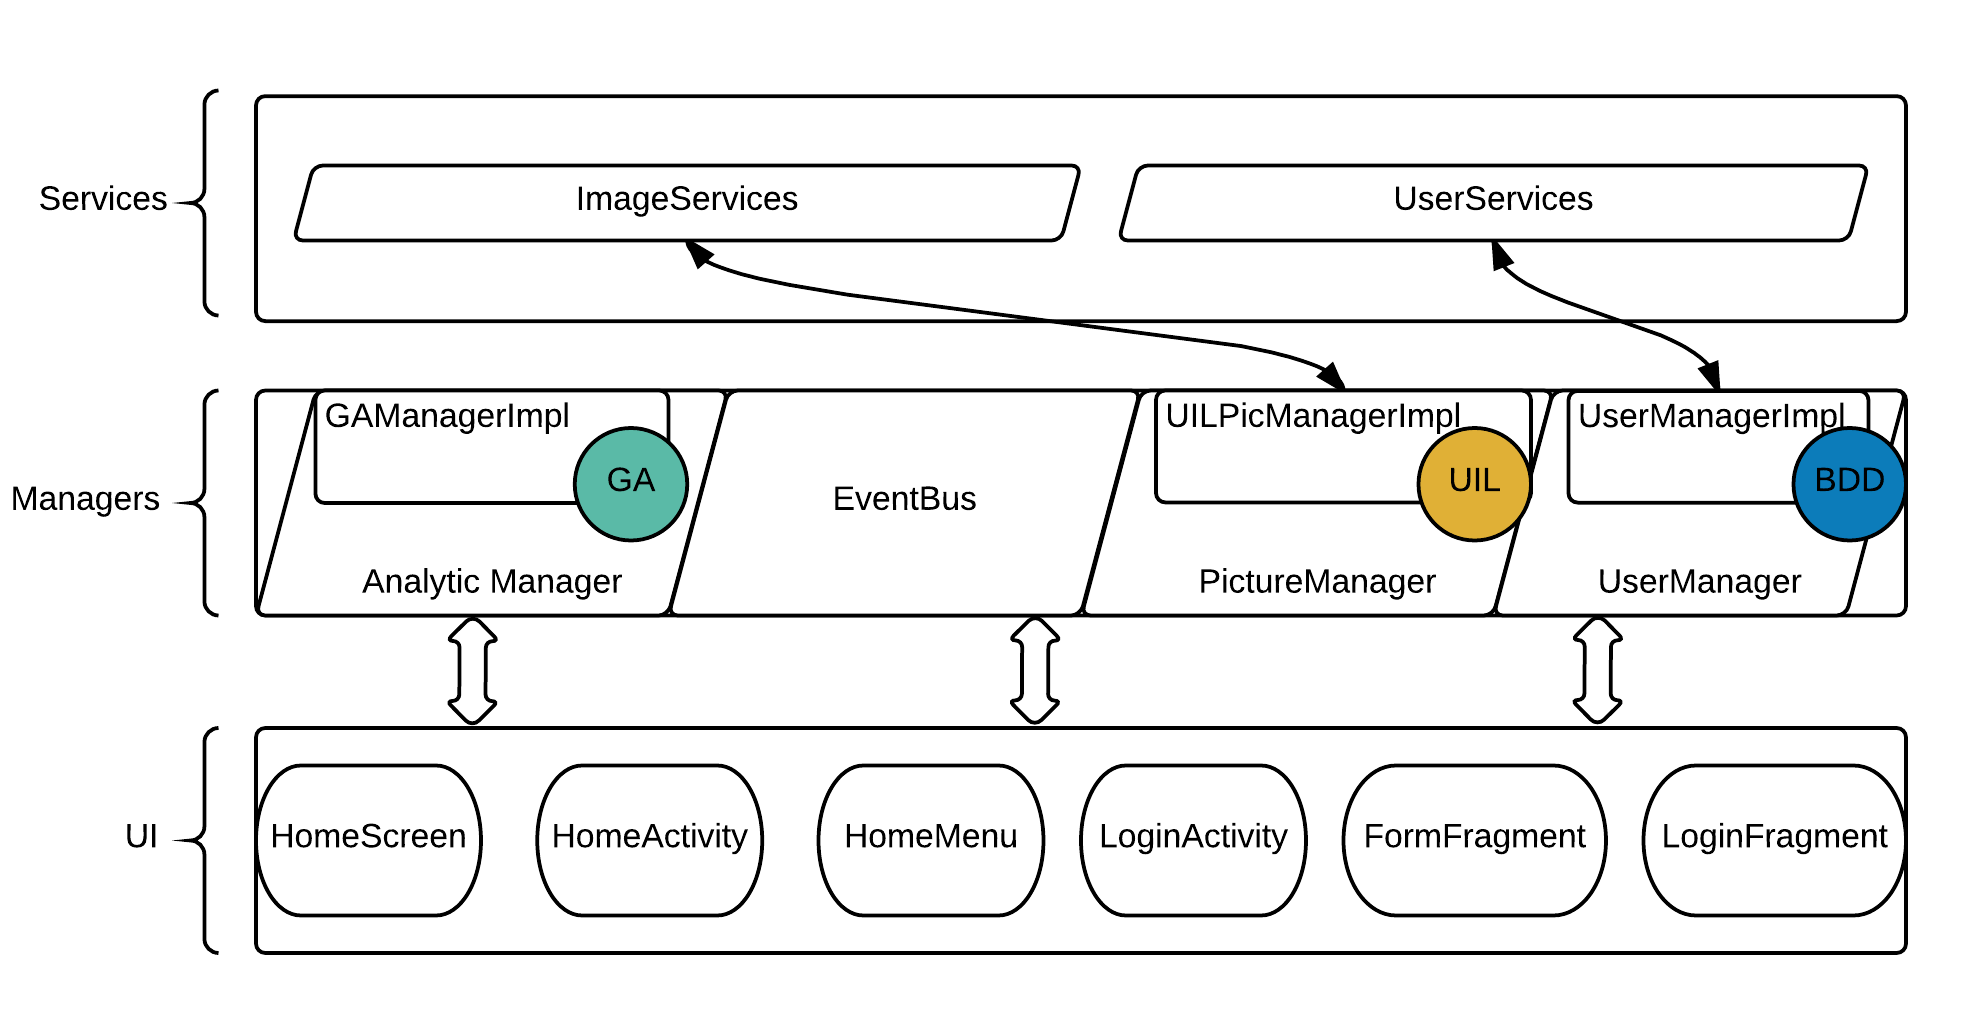
With this architecture, none of my screens knows another. They send and listen events in order to work together. A responsive UI isn’t an issue anymore ! It is quite easy to replace a library, component or anything by another without impacting all our screens because libraries are hidden behind an abstract manager interface. I can identify which part of the code is responsible of a functionality and thus it’s really easy to test it.
1.2. Dagger
To perform our library abstraction and deal with all of our managers, Pandroid uses Dagger 2 which is a powerful Dependencies Injection Library.
|
Tip
|
The official documentation is available here. |
1.3. Event Bus
Pandroid uses a EventBusManager to share informations between screens. The main idea is to avoid screens interdependencies. Activities and fragments stay independents in order to be more flexible with UI changes.
Pandroid offers a simple and powerful implementation of EventBusManager. This implementation works with a gradle plugin which generates code and simplifies your life.
Let’s see how it works:
Send a simple Object
    @OnClick(R.id.event_send_localy)
    public void sendLocaly() {
        eventBusManager.send(tvMessage.getText().toString()); // send a string object with no tag
    }
    // generate a $CURRENT_CLASS$ReceiversProvider that refer this method
    // a Pandroid lifecycle delegate will register this generate class to the event bus for you
    // in non PandroidLifecycle class you will have to un/register the provider by yourself
    @EventReceiver
    public void receiveLocalMessage(String message) {
        toastManager.makeToast(getActivity(), message, null);
    }
Send an Object with a tag
    @OnClick(R.id.event_send_to)
    public void sendToSecondFragment() {
        eventBusManager.send(tvMessage.getText().toString(), EventSecondFragment.TAG, EventBusManager.DeliveryPolicy.AT_LEAST_ONE);
    }

    @EventReceiver({TAG, "toto"}) //Generate provider with a tag to filter event
    public void onReceiveMessage(@EventTag String tag, String msg) { // '@EventTag String tag' parameter is optional
        String txt = tvMessage.getText().toString();
        String text = txt + "\n" + msg;
        logWrapper.d(TAG, "message with tag '"+tag+"' received : " + msg);
        tvMessage.setText(text);
    }
Delivery policy
    enum DeliveryPolicy {
        //The message will be delivery only to the registered receiver at the moment the message is send
        UNCHECKED,
        //The message will be keep until at least one receiver get it
        AT_LEAST_ONE,
        //The message will be keep until another message with the same id override it or it is cancelled
        UNLIMITED
}|
Tip
|
This example is available in the demo project |
2. Panda style
|
Note
|
This part is about the Pandroid pattern and some of the core functionalities. |
2.1. Plugin configuration
To avoid expansive compilation or multidex issues, Pandroid has some optional libraries that you will have to configure before any usage. If you forget to specify the optional library, you will get an error displaying "no class found exception"
To add the needed dependencies you have to declare it in the pandroid extension of your project
pandroid{
    library('libName') { //Regex matching declared configurator that will bring the dependency
        libParam1 'param1'
        libParam2 'param2'
    }
}
The plugin is using configurators in order to extract the librairies configurations from Pandroid. It allows you to modify the gradle’s configuration and the manifest of your app when the plugin is applied.
To see default configurators, take a look at this pandroid.gradle.
Here is an example:
pandroid{
    configurators{
        'name.of.my.lib' {
            gradle {
            //This part will be applyed on your build.gradle
                config ->
                dependencies {
                   compile ('name.of.my.lib:version')
                }
            manifest {
            //This part will be merged to your manifest
                config ->
                        '''
        <application>
            <meta-data
                android:name="my.lib.ApiKey"
                android:value="''' + config.libParam1 + '''" />
        </application>
    '''
    }
}|
Warning
|
Some of the libraries need plugins in order to work (Analytics, Crashlytics, …). You will have to configure the plugin classpath by yourself because pandroid can’t resolve it |
|
Tip
|
All configuration files applied to your project can be found in the pandroid folder in your build folder |
2.2. PandroidApplication
Your application has to extend PandroidApplication in order to:
-
Initialize PandroidConfig with the app’s BuildConfig. This class allows the library to know if your app is in DEBUG mode. (To enable Logger for example)
-
Initialize the logger. See Logger part to know how to customize it.
-
Handle Dagger component injection. Pandroid classes will inject their manager using the PandroidApplication. You can give a custom base component by overriding createBaseComponent()
    @Override
    protected BaseComponent createBaseComponent() {
        return DaggerDemoComponent.builder()
                .demoModule(new DemoModule())
                .pandroidModule(new PandroidModule(this) {
                    @Override
                    protected List<TrustManager> getTrustManagers() {
                        List<TrustManager> keyManagers = super.getTrustManagers();
                        PandroidX509TrustManager trustManager = new PandroidX509TrustManager(DemoApplication.this);
                        trustManager.addCertificate("leroymerlin.com", R.raw.lmfr_cert);// add certificate for your application
                        keyManagers.add(trustManager);
                        return keyManagers;
                    }

                    @Override
                    protected List<KeyManager> getKeyManagers() {
                        return super.getKeyManagers(); // here you can add you own key manager
                    }
                })
                .build();
    }
2.3. PandroidModule/Component
To work properly, PandroidActivity/PandroidFragment needs managers created by the BaseComponent. That is why PandroidApplication provides this BaseComponent. To simplify your life, your Application Component can extend the BaseComponent in order to be injected automatically in every PandroidActivity/PandroidFragment. The PandroidModule needed by this base component provides the context, a logger, the EventBus and an initialized OkHttpClient.Builder.
2.4. Opener
In Pandroid, an Opener represent the argument of an Activity or a Fragment. In order to work an opener needs an OpenerEventReceiver. When you need to open an Activity or a Fragment you just send an opener in the event bus. The OpenerEventReceiver in charge will catch the event and open the Activity/Fragment with the opener as argument. Then you will be able to access the opener in the PandroidActivity/PandroidFragment with the field opener. The main idea behind Opener is to normalize navigation in the application and remove code responsive of it from your views.
|
Note
|
See PandroidActivity/PandroidFragment part for more details. |
2.5. PandroidActivity
PandroidActivity is the base activity you should extend in a Pandroid application. This activity handles the following points :
-
Dagger injection & LifecycleDelegate initialization
    //@Inject
    //AnyThingInBaseComponent instance;
    @CallSuper
    @Override
    protected void onCreate(Bundle savedInstanceState) {
        //override layout inflater factory if a custom factory is set
        PandroidViewFactory.installPandroidViewFactory(this);
        super.onCreate(savedInstanceState);
        //initialize PandroidDelegate with the default from PandroidApplication
        BaseComponent baseComponent = PandroidApplication.getInjector(this).getBaseComponent();
        logWrapper = baseComponent.logWrapper();
        eventBusManager = baseComponent.eventBusManager();
        pandroidDelegate = createDelegate();
        pandroidDelegate.onInit(this);
        opener = ActivityOpener.getOpener(this);
}-
onResume Helper
    /**
     * call at the end of onResume process. This method will help you determine the king of resume
     * your activity is facing
     *
     * @param state current resume stat of the activity
     */
    protected void onResume(ResumeState state) {
        logWrapper.i(getClass().getSimpleName(), "resume state: " + state);
}-
Back pressed behavior
    @Override
    public void onBackPressed() {
        Fragment fragment = getCurrentFragment(); //override this methode to give your current fragment
        if (fragment != null && fragment instanceof OnBackListener && ((OnBackListener) fragment).onBackPressed()) {
            //back handle by current fragment
        } else if (getSupportFragmentManager().getBackStackEntryCount() > 0) {
            //back handle by getFragmentManager
            getSupportFragmentManager().popBackStack();
        } else {
            onBackExit();
        }
    }


    /**
     * Override this method to show an exit message and enable back confirmation to exit
     *
     * @return true to stop the app exit, false otherwise
     */
    protected boolean showExitMessage() {
        return false;
}-
Provides a receiver that will be attached/detached from your application by the EventBusLifeCycleDelegate
    /**
     * Override this method to automatically (un)register receiver to the event bus with the activity life cycle
     *
     * @return list of receivers attached by EventBusLifecycleDelegate
     */
    @Override
    public List<EventBusManager.EventBusReceiver> getReceivers() {
        if (getApplication() instanceof ReceiversProvider)
            return ((ReceiversProvider) getApplication()).getReceivers();
        return new ArrayList<>();
    }
2.5.1. Activity Opener
To open activity you are encouraged to use the ActivityOpener and ActivityEventReceiver. To make it work you have to:
-
register an ActivityEventReceiver in you PandroidApplication or your current PandroidActivity.
    /**
     * create list of receiver inject in Activity
     * You can override this method to inject activity receiver easily
     *
     * @return list of activity receivers inject in activity
     */
    @Override
    protected List<ActivityEventReceiver> createBaseActivityReceivers() {
        List<ActivityEventReceiver> receivers = super.createBaseActivityReceivers();
        receivers.add(new ActivityEventReceiver()
                .overrideAnimation(new int[]{R.anim.fade_in, R.anim.fade_out})
                .addActivity(OpenerActivity.class));
        receivers.add(new ActivityEventReceiver()
                .addFlags(Intent.FLAG_ACTIVITY_REORDER_TO_FRONT | Intent.FLAG_ACTIVITY_CLEAR_TOP)
                .addActivity(MainActivity.class));
        return receivers;
}-
Then you will be able to send the opener through the event bus.
sendEventSync(new CustomActivityOpener("from Navigation"));-
And access your param in the opened Activity
    @Override
    protected void onCreate(Bundle savedInstanceState) {
        super.onCreate(savedInstanceState);
        setContentView(R.layout.activity_empty);
        //I can access my opener if the activity was open by an ActivityEventReceiver
        if (opener != null) {
            String myOpenerParam = opener.param;
            toastManager.makeToast(this, "param was : " + myOpenerParam, null);
        }
}|
Note
|
you are please to look at the opener part in the demo to see it in action |
2.6. PandroidFragment
PandroidFragment is the base fragment you should extend in a Pandroid application. This Fragment handles the same points than a PandroidActivity.
2.6.1. Fragment Opener
To open a fragment, you are encouraged to use the event bus. All you have to do is to send a FragmentOpener event and… that’s it ! A custom event receiver named FragmentEventReceiver will handle the new fragment for you.
                //create
                startFragment(NavigationLeftFragment.class);
                //same as
                //eventBusManager.send(new FragmentOpener(NavigationLeftFragment.class));
                //...
    @Override
    public List<EventBusManager.EventBusReceiver> getReceivers() {
        List<EventBusManager.EventBusReceiver> receivers = super.getReceivers();
        //This receiver will handle the NavigationLeftFragment and open it in the R.id.main_navigation_container container
        FragmentEventReceiver navigationReceiver = new FragmentEventReceiver().setContainerId(R.id.main_navigation_container).addFragment(NavigationLeftFragment.class);
        receivers.add(navigationReceiver);
        // ...
        // return receivers;
If you use FragmentEventReceiver to open your fragment, you are already giving arguments to your fragment. In fact, when you use startFragment(…), the method will create a FragmentOpener which has two jobs :
-
It will be used to filter the event and find the right receiver
-
It is in charge of building your fragment instance.
By building a custom FragmentOpener, you will be able to send parameters to your fragment. If your opener is parcelable it will be saved as parcelable to the fragment, otherwise, it will be serialized.
To sum up here is an example:
-
Send an event
                // we send a custom FragmentOpener with some argument he needs
                sendEvent(new MaterialOpener(ivInfos, tvInfos));
//...-
FragmentOpener
public class MaterialOpener extends FragmentOpener {

    //this is the params the fragment needs
    public ViewInfosContainer tvInfos;
    public ViewInfosContainer ivInfos;

    public MaterialOpener(ViewInfosContainer ivInfos, ViewInfosContainer tvInfos) {
        super(MaterialFragment.class); // this opener will instantiate a MaterialFragment
        this.ivInfos = ivInfos;
        this.tvInfos = tvInfos;
    }

}-
Manage an event (MainActivity.java)
        receivers.add(new FragmentEventReceiver()
                .setContainerId(R.id.main_content_container)
                .setAnim(FragmentEventReceiver.ANIM_MATERIAL)
                .addFragment(MaterialFragment.class)
.setBackStackTag("material"));-
Get arguments
//I can specify the Opener type here and I wont have to cast it later
public class MaterialFragment extends PandroidFragment<MaterialOpener> implements OnBackListener {

    @Override
    public void onResume(ResumeState state) {
        super.onResume(state);
        switch (state) {
            case FIRST_START:
                //the field opener is the Fragment Opener that was send to the event bus to open the fragment
                //here this opener is a MaterialOpener
                getView().findViewById(R.id.material_tv).setTag("coucou");
                materialTransitionLayout.addAnimationWithViewId(opener.ivInfos, R.id.material_iv);
                materialTransitionLayout.addAnimationWithViewTag(opener.tvInfos, "coucou");
2.7. Lifecycle Delegate
Lifecycle delegates are listeners that are following the lifecycle of an activity or a fragment. They are handled by the PandroidDelegate you find in a PandroidActivity/Fragment. They are used to extract and share behaviors without any heritage.
To understand what we could do with them take a look at this example
public class IcepickLifecycleDelegate extends SimpleLifecycleDelegate<Object> {

    @Override
    public void onCreateView(Object target, View view, Bundle savedInstanceState) {
        super.onCreateView(target, view, savedInstanceState);
        Icepick.restoreInstanceState(target, savedInstanceState);
    }

    @Override
    public void onSaveView(Object target, Bundle outState) {
        if (viewExist)
            Icepick.saveInstanceState(target, outState);
    }
}
By default PandroidLifecycleDelegate is created in your PandroidApplication.
    /**
     * initialize LifecycleDelegate that will listen the activity life cycle
     * Override this method to disable or add more delegate
     *
     * @return PandroidDelegate that will be used in pandroid activity / pandroid fragment
     */
    protected PandroidDelegate createBasePandroidDelegate() {
        PandroidDelegate pandroidDelegate = new PandroidDelegate();
        pandroidDelegate.addLifecycleDelegate(new DaggerLifecycleDelegate());
        pandroidDelegate.addLifecycleDelegate(new EventBusLifecycleDelegate(eventBusManager));
        pandroidDelegate.addLifecycleDelegate(new AutoBinderLifecycleDelegate());
        if (PandroidConfig.isLibraryEnable("butterknife")) {
            pandroidDelegate.addLifecycleDelegate(new ButterKnifeLifecycleDelegate());
        } else {
            logWrapper.v(TAG, "ButterKnife is disabled, add the library in Pandroid extension to use it");
        }
        if (PandroidConfig.isLibraryEnable("icepick")) {
            pandroidDelegate.addLifecycleDelegate(new IcepickLifecycleDelegate());
        } else {
            logWrapper.v(TAG, "Icepick is disabled, add the library in Pandroid extension to use it");
        }
        if (PandroidConfig.isLibraryEnable("rxandroid")) {
            pandroidDelegate.addLifecycleDelegate(new RxLifecycleDelegate());
        } else {
            logWrapper.v(TAG, "RxAndroid is disabled, add the library in Pandroid extension to use it");
        }
        return pandroidDelegate;
    }

    @Override
    public PandroidDelegate getPandroidDelegate() {
        return createBasePandroidDelegate();
}|
Note
|
you could override this method to bring new behavior to all activity and fragment. |
2.8. Auto bind Lifecycle Delegate
If you need to associate your custom Lifecycle Delegate automatically you can use the annotation @BindLifeCycleDelegate in PandroidActivity/Fragment
Example :
public class PresenterFragment extends PandroidFragment<FragmentOpener> implements TestPresenter.TestPresenterView{


    @BindLifeCycleDelegate
    LoggerLifeCycleDelegate mLoggerLifeCycleDelegate = new LoggerLifeCycleDelegate();

    @Inject
    @BindLifeCycleDelegate
TestPresenter mTestPresenter;|
Note
|
If your delegate is not initialized or inject before the onCreate then the auto binder will try to create an instance by himself |
|
Warning
|
The class initialization must be done in the createDelegate() or before its call. If you do it after that your class will be ignored |
2.9. Logger
A powerful logger is a very important part of your development. A logger can become your best friend to identify bugs remotely. But keep in mind that your logger has to be properly configured to avoid any security vulnerability or debugging mess.
To help you with that, Pandroid proposes a PandroidLogger that you can get by singleton but that you are encouraged to inject with the BaseComponent of your PandroidApplication to get more flexibility. This Logger is a LogWrapper which means it can wrap any logger you need. In your PandroidApplication, the LogcatLogger is added by default to your loggerWrapper.
    protected void initializeLogger() {
        logWrapper = PandroidLogger.getInstance();
        logWrapper.setDebug(PandroidConfig.DEBUG);
        logWrapper.addLogger(LogcatLogger.getInstance());
        if (PandroidConfig.isLibraryEnable("crashlytics")) {
            logWrapper.addLogger(new CrashlyticsLogger(this));
        }
    }
2.9.1. Crashlytics
Crashlytics is an optional library in pandroid.
-
build.gradle
    buildscript {
    repositories {
        maven { url 'https://maven.fabric.io/public' }
    }
    dependencies {
        classpath 'io.fabric.tools:gradle:1.25.2'
    }
    }

pandroid
{
    dependencies{
        library ("crashlytics"){
            apiKey "YOUR_CRASHLYTICS_API_KEY"
        }
    }
}
That’s it ! The crashlytics logger will be added automatically. By default it is is configured to be activated when the BuildConfig.DEBUG is false If needed you can override this behaviour
2.10. RxAndroid
RxAndroid is an optional library in pandroid.
-
build.gradle
pandroid
{
    dependencies{
        library "rxandroid"
    }
}
Once enable you will be able to use Rx version of some manager (RxCryptoManager, RxConfigurationManager, …). RxPandroidCall will be available automatically with retrofit and you will be able to use RxPandroidActivity/RxPandroidFragment in order to access useful methods to register you Observable on the app lifecycle.
        //We can cast to RxPandroidCall if rxandroid is enable in the plugin configuration
        reviewService.getReview("1")
                .rxEnqueue()
                //bind observer on lifecycle thanks to RxPandroidFragment
                .compose(this.<Review>bindLifecycle())
                .subscribe(o -> {
                    //we can access getActivity() with no check because call will be cancel if our app is paused
                    toastManager.makeToast(getActivity(), o.getTitle(), null);
                }, throwable -> {
                    logWrapper.w(TAG, throwable);
});@RxWrapper annotation can be used to generate a rx version of you class.
@Target({ElementType.METHOD, ElementType.TYPE})
public @interface RxWrapper {
    /**
     * if true the wrapper will return a single result and complete, otherwise it will return values until it is explicitly cancelled
     *
     * @return true by default
     */
    boolean singleValue() default true;

    /**
     * if true the result will be wrap in a model (use to get multiple error or null response)
     * if the result is wrap no error will be throw to the single
     *
     * @return false by default
     */
    boolean wrapResult() default false;
}
For exemple :
//ReviewManager.java
public interface ReviewManager {
    @RxWrapper
    void getReview(String productId, ActionDelegate<Review> delegate);

    @RxWrapper(wrapResult = true)
    Review getLastReview();
}

//DemoModule.java
    @Provides
    @Singleton
    RxReviewManager provideRxReviewManager(ReviewManager reviewManager) {
        return new RxReviewManager(reviewManager);
    }

//RxFragment.java
public class RxFragment extends RxPandroidFragment<FragmentOpener> {
    private static final String TAG = "RxFragment";
    @Inject
    RxReviewManager reviewManager;

    @Override
    public void onResume() {
        super.onResume();

        reviewManager.rxGetLastReview()
                .flatMap(reviewResult -> reviewResult.result != null ? Single.just(reviewResult.result) : reviewManager.rxGetReview("1"))
                .compose(this.<Review>bindLifecycleObserveOnMain())
                .subscribe(review -> {
                    //we are sure fragment is still not detached thanks to the compose
                    //no need to check getActivity()!=null
                    toastManager.makeToast(getActivity(), review.getTitle(), null);
                }, throwable -> {
                    logWrapper.w(TAG, throwable);
                });
2.11. Android DataBinding
Pandroid provided an annotation to help the use of Android Data Binding in your project. This feature has been disabled for now but should returned soon. If you want to check its old implementation see branch feature/databinding
2.12. MVP
A good application, is an appliction well structured. To help the developers Pandroid provide a Presenter class to use the famous pattern MVP. The Presenter is bound to the application’s lifecycle.
|
Note
|
see the demo to see it in action |
2.13. Templates
To help you, Pandroid provides templates for Android Studio. In order to install them, you just have to apply 'com.leroymerlin.android-templates' plugin on your project. Pandroid will add and update the templates automatically.
To access the templates, restart once the IDE and a Pandroid entry will be available in the "new" menu (right click on your package > new, or cmd + n)
3. Security
3.1. Proguard
Pandroid helps you to use Proguard. The Pandroid plugin brings the pandroid-proguard-rules.pro in the pandroid build folder. By default, the Android plugin is configured to use this file
android {

    lintOptions {
        disable 'InvalidPackage'
    }

    buildTypes {
        all {
            minifyEnabled false
            proguardFiles getDefaultProguardFile('proguard-android.txt'), 'build/pandroid/pandroid-proguard-rules.pro'
            if (file('proguard-rules.pro').exists()) {
                proguardFiles 'proguard-rules.pro'
            }
        }
        if (!plugins.hasPlugin("com.android.library")) {
            release {
                minifyEnabled true
            }
        }
    }

}|
Warning
|
Make sure that your application does not overwrite the proguard’s configuration |
3.2. Encryption Manager
To help you encrypt critical data, Pandroid provides a CryptoManager implementation: RsaAesCryptoManager. This manager provides two ways to encrypt/decrypt datas: symmetric using AES and asymmetric using RSA.
|
Warning
|
None of these encryption methods are unbreakable. Keep in mind that the best way to keep data safe on the phone is probably not to keep them. |
3.3. Secure Key
Pandroid extension provide tools to encrypt your critical keys. This encryption is based on the app signing configuration. Make sure your application is properly configure.
-
to encrypt your key
pandroid{
    secureConfigFields{
        all{
            secureField "YOUR_KEY_NAME", "YOUR_KEY"
        }
        //apply on applicationVariant that contrains the name
        prod { //proDebug prodRelease
            secureField "YOUR_KEY_NAME", "YOUR_PROD_KEY"
        }
    }
}-
to decrypt your key
//your secure field will be add to BuildConfig with the prefix SECURE_
String decryptKey = PandroidConfig.getSecureField(context, BuildConfig.SECURE_YOUR_KEY_NAME)
//...
4. Network
4.1. TrustManager / KeyManager
If you need to add custom TrustManager or KeyManager, you can override the PandroidModule methods in your application Class.
An example is available in DemoApplication.
                    @Override
                    protected List<TrustManager> getTrustManagers() {
                        List<TrustManager> keyManagers = super.getTrustManagers();
                        PandroidX509TrustManager trustManager = new PandroidX509TrustManager(DemoApplication.this);
                        trustManager.addCertificate("leroymerlin.com", R.raw.lmfr_cert);// add certificate for your application
                        keyManagers.add(trustManager);
                        return keyManagers;
                    }

                    @Override
                    protected List<KeyManager> getKeyManagers() {
                        return super.getKeyManagers(); // here you can add you own key manager
                    }
4.2. Delegate
To perform async calls, Pandroid provides a generic delegate that you can use.
package com.leroymerlin.pandroid.future;

public interface ActionDelegate<T> {

    void onSuccess(T result);

    void onError(Exception e);

}
To help you avoid errors during a view update once your activity or fragment has been released, Pandroid provides CancellableActionDelegate and NetActionDelegate. Those classes have the ability to be cancelled to ignore the async result. These delegates can be registered to your PandroidActivity/PandroidFragment in order to be cancelled automatically during the onPause.
        //If the CancellableActionDelegate/NetActionDelegate is cancelled the retrofit request will be cancelled too and the result ignored
        //Note that the Delegate is register to the Fragment and will be cancel by the PandroidDelegate for you if the fragment is paused
        reviewManager.getReview("1", new NetActionDelegate<Review>(this) {
            @Override
            public void success(Review result) {
                toastManager.makeToast(getActivity(), result.getTitle(), null);
            }

            @Override
            public void onNetworkError(int statusCode, String errorMessage, String body, Exception e) {
                toastManager.makeToast(getActivity(), errorMessage, null, R.style.Toast_Error);
            }
        });
4.3. Retrofit
Pandroid provides the Retrofit library. Retrofit is a library used to perform REST webservice requests in a simple way.
|
Tip
|
See official documentation to use Retrofit |
    @Provides
    @Singleton
    ReviewService provideDemoService(OkHttpClient.Builder clientBuilder, Context context, LogWrapper logWrapper) {
        //PandroidCall handle Action Delegate on main thread and mock annotation
        PandroidCallAdapterFactory factory = PandroidCallAdapterFactory.create(context, logWrapper);
        factory.setMockEnable(PandroidConfig.DEBUG);
        Retrofit.Builder builder = new Retrofit.Builder()
                .client(clientBuilder.build())
                .addConverterFactory(GsonConverterFactory.create())
                .addCallAdapterFactory(factory)
                .baseUrl(BuildConfig.BASE_URL_PRODUCT);
        return builder.build().create(ReviewService.class);
} @Override
public void getReview(String productId, final ActionDelegate<Review> delegate) {
//Standard Retrofit way
/*
Call<Review> review = reviewService.getReview(productId);
review.enqueue(new Callback<Review>() {
@Override
public void onResponse(Call<Review> call, Response<Review> response) {
try {
if (response.isSuccessful()) {
delegate.onSuccess(response.body());
} else {
String string = response.errorBody().string();
delegate.onError(new Exception(response.code() + ": " + string));
}
} catch (IOException e) {
onFailure(call, e);
}
}
@Override
public void onFailure(Call<Review> call, Throwable t) {
//Be carefull with the onFailure. This method can be called by retrofit outside of the main thread
//You can't update you UI directly
//delegate.onError(new Exception("Fail to get product", t)); => Error
}
});
*/
// Pandroid way
// if you need the Retrofit Response object
PandroidCall<Response<Review>> reviewReponsePandroidWay = reviewService.getReviewReponsePandroidWay(productId);
reviewReponsePandroidWay.enqueue(new ActionDelegate<Response<Review>>() {
@Override
public void onSuccess(Response<Review> result) {
lastResult = result.body();
//be careful the response could be an error code
//you have to check it yourself
if (result.isSuccessful()){
logWrapper.d(TAG, "result received has retrofit Response");
}
}
@Override
public void onError(Exception e) {
logWrapper.e(TAG, e);
}
});
//Easiest way to get your object
//if the retrofit response is an error it will pass the onError method of the delegate
PandroidCall<Review> reviewPandroidWay = reviewService.getReviewPandroidWay(productId);
reviewPandroidWay.enqueue(delegate);
}4.3.1. Mock
If your service uses the PandroidCallAdapterFactory, you can use the Mock annotation to simulate network calls. The mock has to be enabled during the declaration of your PandroidCallAdapterFactory.
public interface ReviewService {

    @GET("posts/{id}")
    RxPandroidCall<Review> getReview(@Path("id") String id);


    //Mocks have to enable in PandroidCallFactory
    @Mock(
            enable = true, //mock can be desable one by one
            delay = 400,   //delay before response
            statusCode = 200, //response statusCode
            mockClass = ServiceMock.class, //Mock class to change response dynamically
            path = "mock/reviews.json" //path to response json file in your assets
    )
    @GET("posts/{id}")
    PandroidCall<Review> getReviewPandroidWay(@Path("id") String id);

    @GET("posts/{id}")
    RxPandroidCall<Response<Review>> getReviewReponsePandroidWay(@Path("id") String id);

}
4.4. Picture
Pandroid provides a PictureManager to help you extract your image library from your code. PictureManager allows you to associate an image (with its URL) to an ImageView Options are available such as adding a placeholder image or a delegate method (listener) to perform processing when loading the image.
4.4.1. Glide
Glide is an optional library. To use it you need to add the dependency to the Pandroid dependencies in your build.gradle file.
pandroid{
    dependencies {
        library("glide"){
            glideModule "com.leroymerlin.pandroid.ui.picture.glide.PandroidGlideModule" //default value
            //can be ignored if set to null or if in your glide module your override isManifestParsingEnabled
        }
    }
}
Tip : See https://github.com/bumptech/glide to setup GlideModule
-
Module
    @Provides
    @Singleton
    PictureManager providePictureManager(Context context) {
        GlidePictureManagerImpl glidePictureManager = new GlidePictureManagerImpl(context);
        glidePictureManager.configure(
                glidePictureManager
                        .loader()
                        .placeHolder(R.drawable.pandroid_img_nophoto)
        );
        return glidePictureManager;
}-
Inject it
    @Inject
    PictureManager pictureManager;

    @Override
    public void onViewCreated(View view, Bundle savedInstanceState) {
        super.onViewCreated(view, savedInstanceState);


        pictureManager.loader()
                .source("http://community.coreldraw.com/cfs-filesystemfile/__key/communityserver-components-secureimagefileviewer/telligent-evolution-components-attachments-13-393-00-00-00-14-32-80/Pandroid.JPG_2D00_1004x819.jpg")
                .context(this)
                .target((ImageView) view.findViewById(R.id.rest_iv))
                .placeHolder(R.drawable.pandroid_img_nophoto)
                .listener(new ImageLoadingListener() {
                    @Override
                    public void onLoadingFailed(Object imageUri, ImageView view) {

                    }

                    @Override
                    public void onLoadingComplete(Object imageUri, ImageView view) {

                    }
                })
                .load();

    }
5. User interface
5.1. Animation
    enum DeliveryPolicy {
        //The message will be delivery only to the registered receiver at the moment the message is send
        UNCHECKED,
        //The message will be keep until at least one receiver get it
        AT_LEAST_ONE,
        //The message will be keep until another message with the same id override it or it is cancelled
        UNLIMITED
    }
All these animations can be found in the Pandroid Demo under the animation section. They will be described in their apparition order while running the application.
5.1.1. ResizeView
The simplest method to perform a resize animation on an element. You just call the method with the targeted View as one of the arguments, along with the new size and animation duration.
ResizeAnimation.create(resizeView).height( X ).width( Y ).duration( T ).startAnimation();5.1.2. RotateView
This method works in a similar way that ResizeView and allows to perform a 3D rotation on an object, like flipping a coin.
Rotate3dAnimation rotate3dAnimation = new Rotate3dAnimation(180, 360, Rotate3dAnimation.CENTER.CENTER,
        DeviceUtils.dpToPx(getActivity(), 100), false);
rotate3dAnimation.setRotationAxis(Rotate3dAnimation.AXIS.Y);
rotate3dAnimation.setDuration(1000);
rotateView.startAnimation(rotate3dAnimation);
5.1.3. Material Framgent
This one might be the most interesting animation in the demo, because used in another way. It allows to use a semi-automatic animation between 2 different Views (that could be in different screens ?). To do this we have to provide in an Opener the required arguments, from an ImageView for example, like sizing or position…
ViewInfosContainer ivInfos = new ViewInfosContainer(ivMaterial, view);
ViewInfosContainer tvInfos = new ViewInfosContainer(tvTitle, view);
sendEvent(new MaterialOpener(ivInfos, tvInfos));
Material fragment will be in charge of fetching the position of the first view and create an animation to transition with the second one.
materialTransitionLayout.addAnimation(opener.ivInfos, R.id.material_iv);
materialTransitionLayout.addAnimation(opener.tvInfos, R.id.material_tv);
materialTransitionLayout.setRevealCenter(R.id.material_iv); //Optional Method
materialTransitionLayout.open();
5.1.4. CircularFrameLayout
This animation, last in the Pandroid demo allows to display all the objects and create an animation that finishes on a single visible object. In order to do this, we only have to set the same listener to our 4 Buttons:
view.findViewById(R.id.animation_test_btn).setOnClickListener(circularClickListener);Then update the listener to provide the animation to perform. Puis de modifier notre listener pour lui donner l’animation à réaliser. As shown here, test if the base object is the single one displayed, then perform the animation to make the others visible. Or chose the selected button as the center and perform the animation again.
if (circularFrameLayout.isClipOutEnable()) {
    circularFrameLayout.open(animatorListener);
} else {
    circularFrameLayout.setCenter(v.getX() + v.getWidth() / 2, v.getY() + v.getHeight() / 2);
    circularFrameLayout.animateToRadius(v.getWidth(), getResources().getInteger(R.integer.anim_speed), animatorListener);
}
5.2. List
Pandroid provides an adapter for ListView and RecyclerView. Both of them have the same pattern : you have to provide a HolderFactory and your adapter is responsible of the data list. These adapters help you with items gestures and animations See demo’s examples
        final RecyclerViewAdapter<String> adapter = new RecyclerViewAdapter<String>(new RecyclerFactory<RecyclerHolder<String>>() {
            @Override
            public RecyclerHolder<String> create(LayoutInflater inflater, ViewGroup parent, int viewType) {
                //override the adapter getItemType to handle different type of cell
                //here you can return the holder dealing with the object and type you have
                return new RecyclerHolder<String>(inflater.inflate(R.layout.cell_list, parent, false)) {

                    public TextView tvContent;

                    @Override
                    protected void bindView(View view) {
                        super.bindView(view);
                        tvContent = (TextView) view;
                    }

                    @Override
                    public void setContent(String content, int index) {
                        tvContent.setText(content);
                    }
                };
            }
        }
        );

        //this Touch Helper handle swipe to remove gesture and change position
        SimpleItemTouchHelperCallback simpleItemTouchHelperCallback = new SimpleItemTouchHelperCallback(adapter) {
            @Override
            public void onSwiped(RecyclerView.ViewHolder viewHolder, int direction) {
                toastManager.makeToast(getActivity(), "Item " + viewHolder.getAdapterPosition() + " removed", null, R.style.Toast_Warm);
                super.onSwiped(viewHolder, direction);
            }
        };
        ItemTouchHelper touchHelper = new ItemTouchHelper(simpleItemTouchHelperCallback);
        touchHelper.attachToRecyclerView(rvMenu);
        adapter.addAll(getData());

        //you can add item click listener and long click listener on you adapter
        adapter.setOnItemClickListener(new RecyclerViewAdapter.OnItemClickListener<String>() {
            @Override
            public void onItemClick(RecyclerViewAdapter<String> parent, View view, int position, long id) {
                toastManager.makeToast(getActivity(), "Button " + position + " clicked", null, R.style.Toast, getResources().getInteger(R.integer.toast_short_duration));
            }
        });
        rvMenu.setAdapter(adapter);
A easiest implementation is available for RecyclerView
        adapter = new PandroidAdapter<>();
        adapter.registerFactory(0, HolderFactory.<String>create(R.layout.cell_list, (cellView, data, index) -> ((TextView) cellView).setText(data)));
        adapter.addAll(getData());
        adapter.setOnItemClickListener((parent, itemView, position, id) -> {
            changeData(position);
        });
        rvMenu.setAdapter(adapter);
If you use Kotlin a dsl is available
        adapter<String> {
            holder {
                layout = R.layout.cell_list
                itemType = 0 //your can use class has type, hashcode will be used
                binder = { view, data, index -> (view as Button).text = data }
            }
            holder {
                layout = R.layout.cell_list
                itemType = 1
                holderClass = CustomTxtHolder::class
            }
            holder {
                itemType = 2
                factory = CustomHolderFactory()
            }
            itemTypes { adapter: PandroidAdapter<String>, item: String, position: Int -> position % 3 }
        }
5.3. List header
A view is available to have a QuickHeader. This header can be used with ListView ScrollView and RecyclerView. See ListViewFragment in the demo
    <com.leroymerlin.pandroid.ui.list.QuickHeaderLayout
        android:layout_width="match_parent"
        android:layout_height="0dp"
        android:layout_weight="1">
        <!-- The first view is the scrollable one -->
        <ListView
            android:id="@+id/list_lv"
            android:padding="@dimen/small_spacing"
            android:layout_width="match_parent"
            android:layout_height="match_parent" />
        <!-- The second layout is the view you want to use as a header -->
        <TextView
            android:layout_width="match_parent"
            android:layout_height="50dp"
            android:background="@color/pandroid_gray"
            android:gravity="center"
            android:text="@string/list_header_listview" />
    </com.leroymerlin.pandroid.ui.list.QuickHeaderLayout>
5.4. Toast
Pandroid allows you to customize Android Toast notifications thanks to a dedicated ToastManager. With this manager, you can change the style of your toasts by choosing among 3 styles :
    <declare-styleable name="ToastAppearance">
        <attr name="toastTextColor" format="color" />
        <attr name="toastButtonTextColor" format="color" />
        <attr name="toastBackground" format="color" />
    </declare-styleable>

    <style name="Toast">
        <item name="toastTextColor">@color/white</item>
        <item name="toastButtonTextColor">@color/white</item>
        <item name="toastBackground">@color/pandroid_green</item>
    </style>

    <style name="Toast.Error">
        <item name="toastBackground">@color/pandroid_red</item>

    </style>

    <style name="Toast.Warm">
        <item name="toastBackground">@color/pandroid_orange</item>
    </style>
If needed, you can declare your own style.
You can also add a ToastListener to know when the toast is dismissed or clicked.
It’s possible to make a more advanced toast by adding an image, a button, or even a loader to it.
Two implementations of the manager are available SnackbarManager (included) and SupertoastManagerImpl (optional library)
5.4.1. Supertoast
Supertoast is optional, to use it you need to add the dependency to the Pandroid dependencies in your module build.gradle file :
-
build.gradle
pandroid{
    dependencies {
        library "supertoast"
    }
}
You can inject the manager with dagger to use it in your classes, don’t forget to provide it in your app module class :
    @Provides
    @Singleton
    ToastManager provideToastManager() {
        return new SuperToastManagerImpl();
        //could be return new SnackbarManager();
    }
The ToastManager interface exposes a list of methods to display toasts, here is an example of a simple error styled toast :
            @Override
            public void onNetworkError(int statusCode, String errorMessage, String body, Exception e) {
                toastManager.makeToast(getActivity(), errorMessage, null, R.style.Toast_Error);
            }
5.5. Scanner
5.5.1. Vision
Vision is an optional Google Play Services library. You will have to declare it in the Pandroid extension. Pandroid provides a PandroidScannerView to integrate the library
|
Tip
|
The official documentation is available here. |
-
build.gradle
pandroid{
    dependencies {
        library "vision"
    }
}-
usage (ScannerFragment.java)
    /**
     * Starts or restarts the camera source, if it exists.  If the camera source doesn't exist yet
     * (e.g., because onResume was called before the camera source was created), this will be called
     * again when the camera source is created.
     */
    private void startCameraSource() throws SecurityException {
        // check that the device has play services available.


        if (mCameraSource != null) {
            try {
                pandroidScannerView.start(mCameraSource);
            } catch (IOException e) {
                Log.e(TAG, "Unable to start camera source.", e);
                mCameraSource.release();
                mCameraSource = null;
            }
        }
    }

    private void createCameraSource() {

        Context context = getActivity().getApplicationContext();

        int code = GoogleApiAvailability.getInstance().isGooglePlayServicesAvailable(
                getActivity());
        if (code != ConnectionResult.SUCCESS) {
            GoogleApiAvailability.getInstance().getErrorDialog(getActivity(), code, 100).show();
        } else {

            // A barcode detector is created to track barcodes.  An associated multi-processor instance
            // is set to receive the barcode detection results, track the barcodes, and maintain
            // graphics for each barcode on screen.  The factory is used by the multi-processor to
            // create a separate tracker instance for each barcode.
            BarcodeDetector barcodeDetector = new BarcodeDetector.Builder(context).build();
            processor = new PandroidScannerView.SimpleProcessor() {

                @Override
                public boolean handleBarcode(Barcode barcode) {
                    toastManager.makeToast(getActivity(), "Detected: " + barcode.displayValue, new ToastManager.ToastListener() {
                        @Override
                        public void onDismiss() {
                            processor.resumeDetector();
                        }

                        @Override
                        public void onActionClicked() {

                        }
                    });
                    return true;
                }
            };
            barcodeDetector.setProcessor(processor);

            if (!barcodeDetector.isOperational()) {
                // Note: The first time that an app using the barcode or face API is installed on a
                // device, GMS will download a native libraries to the device in order to do detection.
                // Usually this completes before the app is run for the first time.  But if that
                // download has not yet completed, then the above call will not detect any barcodes
                // and/or faces.
                //
                // isOperational() can be used to check if the required native libraries are currently
                // available.  The detectors will automatically become operational once the library
                // downloads complete on device.
                Log.w(TAG, "Detector dependencies are not yet available.");
            }

            // Creates and starts the camera.  Note that this uses a higher resolution in comparison
            // to other detection examples to enable the barcode detector to detect small barcodes
            // at long distances.
            CameraSource.Builder builder = new CameraSource.Builder(context, barcodeDetector)
                    .setFacing(CameraSource.CAMERA_FACING_BACK)
                    .setRequestedPreviewSize(1600, 1024)
                    .setRequestedFps(30.0f)
                    .setAutoFocusEnabled(true);

            mCameraSource = builder.build();
        }

    }
5.6. Custom LayoutInflater factories
If you need a custom behaviour in your layout inflater you can override getLayoutInflaterFactories in PandroidApplication to provide your own factories. If needed you can implement PandroidFactoryProvider in your Activity to add a local factory.
By default Pandroid is configure to add a ViewCompatFactory if you enable it in the extension. See Pandroid PandroidCompat for details
5.7. Custom Views
A custom Lollipop loader is available to create beautiful loading screens.
PandroidCompat(TextView/EditText/…) are available to support Vector Drawable on pre lollipop devices. To enable this support use pandroid extension
pandroid {
    enableViewSupport = true
}
Or use PandroidCompat views in your xml
        <!-- if pandroid{ enableViewSupport = true } Button will be replace by Pandroid support view-->
        <Button
            tools:ignore="MissingPrefix"
            android:id="@+id/animation_btn_material"
            android:layout_width="match_parent"
            android:layout_height="wrap_content"
            android:text="@string/animation_open_material"
            app:drawableLeftPCompat="@drawable/ic_error_outline_24dp"
            app:drawableRightPCompat="@drawable/ic_error_outline_24dp"
            app:drawableTopPCompat="@drawable/ic_error_outline_24dp"
            app:drawableBottomPCompat="@drawable/ic_error_outline_24dp"
            app:drawableTintPCompat="@color/pandroid_green"
             />

        <!-- if pandroid{ enableViewSupport = false } you can use Pandroid support view-->
        <com.leroymerlin.pandroid.ui.support.PandroidCompatButton
            tools:ignore="MissingPrefix"
            android:layout_width="match_parent"
            android:layout_height="wrap_content"
            android:text="@string/animation_open_material"
            app:drawableLeftPCompat="@drawable/ic_error_outline_24dp"
            app:drawableRightPCompat="@drawable/ic_error_outline_24dp"
            app:drawableTopPCompat="@drawable/ic_error_outline_24dp"
            app:drawableBottomPCompat="@drawable/ic_error_outline_24dp"
            app:drawableTintPCompat="@color/pandroid_green"
            android:visibility="gone"
            tools:visibility="visible"
            />
6. Storage
6.1. Preferences
To store preferences, a ConfigurationManager is available to abstract any storage library.
This implementation of ConfigurationManager uses Android SharePreferences to store your object. If needed, the manager can serialize your object to string with GSON.
6.2. Loader
To process heavy async tasks, you should use Android Loader instead of AsyncTask. You can find the documentation here To help you doing so, Pandroid provides a SimpleAsyncTaskLoader.
        Bundle b = new Bundle();
        b.putLong("fibonacci", 28);
        getLoaderManager().initLoader(0, b, new LoaderManager.LoaderCallbacks<Long>() {
            @Override
            public Loader<Long> onCreateLoader(int id, Bundle args) {
                final long fibonacci = args.getLong("fibonacci");
                return new SimpleAsyncTaskLoader<Long>(getActivity()) {
                    @Override
                    public Long loadInBackground() {
                        return fibonacci(fibonacci);
                    }
                };
            }

            @Override
            public void onLoadFinished(Loader<Long> loader, Long data) {
                toastManager.makeToast(getActivity(), "Result : " + data, null);
            }

            @Override
            public void onLoaderReset(Loader<Long> loader) {

            }
        });
7. Analytics
7.1. Google Analytics
Google Analytics is an optional library.
You need to add the dependency in your build.gradle
buildscript {
    repositories {
        jcenter()
    }
    dependencies {
        classpath 'com.google.gms:google-services:3.2.0'
    }
}
//apply the plugin at the end of your build.gradle to avoid error
apply plugin 'com.google.gms.google-services'

pandroid {
    dependencies {
        library 'play-services-analytics'
    }
}
Finally, in your module, you can provided Analytics Manager and configure your tracker.
    @Provides
    @Singleton
    AnalyticsManager provideAnalyticsManager(GoogleAnalyticsManager googleAnalyticsManager) {

        // set your GA ID Analytics
        String AnalyticsGaId = "YOUR_ANALYTICS_GA_ID";

        if (!TextUtils.isEmpty(AnalyticsGaId)) {
            Tracker tracker = googleAnalyticsManager.getAnalytics().newTracker(AnalyticsGaId);
            tracker.enableAutoActivityTracking(true);
            googleAnalyticsManager.getTrackers().add(tracker);
        }
        return googleAnalyticsManager;
    }
7.2. Firebase Analytics
Firebase Analytics is an optional library.
You need to add the dependency in your build.gradle
buildscript {
    repositories {
        jcenter()
    }
    dependencies {
        classpath 'com.google.gms:google-services:3.2.0'
    }
}
//apply the plugin at the end of your build.gradle to avoid error
apply plugin 'com.google.gms.google-services'

pandroid {
    dependencies {
        library 'firebase-analytics'
    }
}|
Warning
|
GMS services now require a google-services.json configuration file. Please refer to the official documentation It can be generated here : https://developers.google.com/mobile/add |
8. Tests
Coming soon
9. Utils
Here are all the static classes you usually need in your projects
Get info on the device, convert pixel to dp or open/close the keyboard.
Provide copy file method, read data from assets.
This class helps you check network stats, get the current IP, disable/enable WIFI, …
Help you with all the Android OS stuff (run command, check root, uninstall App)